
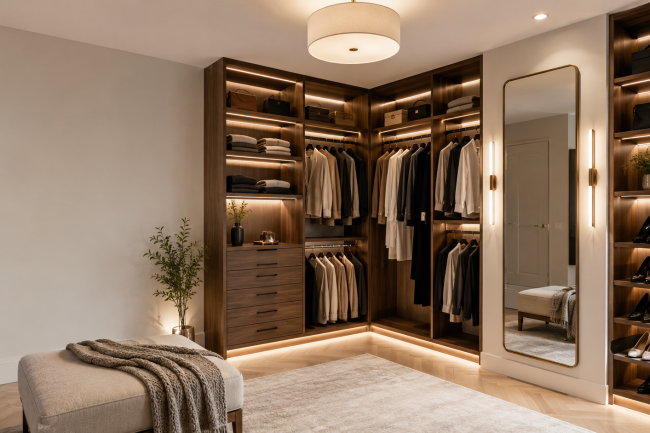
 Closet lighting ideas that actually work, from LED strip placement and colour temperature to what to plan during a build and what can be retrofitted.
There is a specific frustration that has nothing to do with organization. The closet is tidy, everything has a place, and you still cannot tell the navy jacket from the black one without carrying it to a window.
That is a lighting problem, and it is the most common thing left out of an otherwise well-planned closet.
The cause is nearly always the same. One fixture in the ceiling, positioned behind you as you face the storage, which means you are standing in your own shadow looking at the thing you are trying to see. No amount of shelving fixes that.
This guide covers what to install where, the colour temperature that lets you judge colour accurately, what has to be planned during a build, and what can still be added afterwards.
Why the ceiling fixture fails
Worth understanding the mechanics, because it explains every fix that follows.
Light travels in straight lines. When the source is behind and above you, your body blocks it, and the shadow lands exactly where you are looking. In a reach-in closet you are standing in the doorway with the fixture behind you in the room. In a walk-in you are standing under it facing a wall.
The problem gets worse the deeper the storage. A shelf 16 inches deep, lit from a ceiling fixture 4 feet away, has a bright front edge and a dark back. That is where things get lost.
There is a second issue. A single overhead source produces hard shadows under every shelf, so the space beneath each one reads as a dark band. In a closet with six shelves, that is six dark bands at exactly the heights you look at most.
The fix is not a brighter ceiling fixture. It is more sources, positioned closer to what they are lighting.
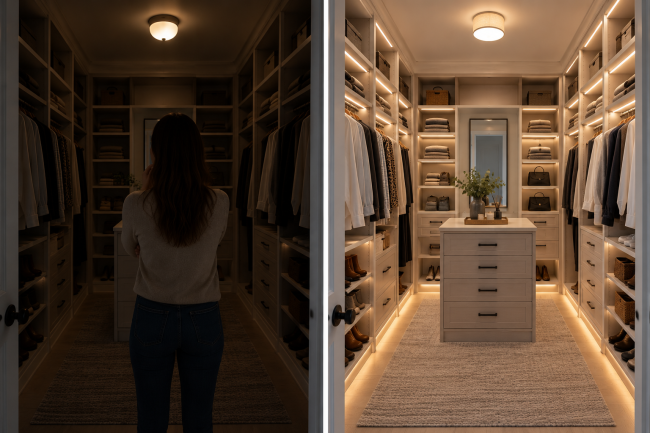
The four types of closet lighting
Most good closets use two or three of these together.
Under-shelf strip lighting
The single most effective change available, and the one that transforms how a closet feels.
An LED strip mounted under the front edge of each shelf throws light down onto whatever is below it. In a double-hung section, a strip under the upper shelf lights the lower hanging tier, which is otherwise the darkest zone in the room.
Strips can be surface-mounted in a small channel or recessed into a routed groove. Recessed is cleaner and has to be planned at fabrication. Surface-mounted in an aluminium channel is nearly as good and can be added later.
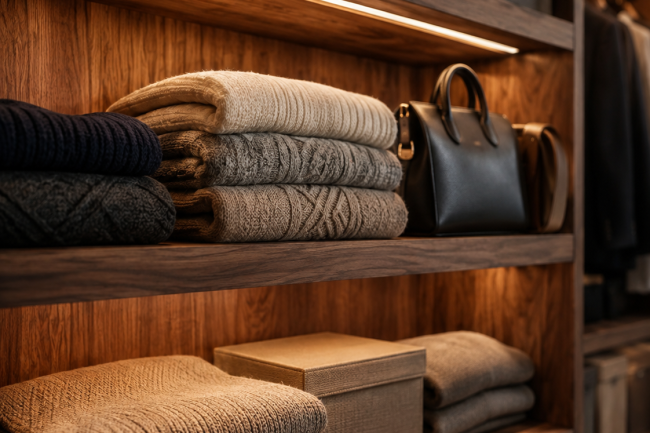
Rod lighting
An illuminated hanging rod, or a strip mounted immediately above the rod, lights the garments themselves rather than the shelf above them.
Particularly useful in a single-hang section where a long coat or dress would otherwise sit in shadow from the waist down.
Toe-kick and floor-level lighting
A strip in the recess at the base of the run. It does two things: lights the shoe storage that would otherwise be the darkest part of the closet, and gives a low-level glow that makes a walk-in feel considerably less like a cupboard.
Often paired with a motion sensor so it comes on as you enter.
Ambient and decorative
A pendant or a small chandelier in a walk-in, or wall lights either side of a mirror.
These are for the feel of the room rather than for finding things. A dressing room with a pendant looks like a room. The same room with only strip lighting looks like storage. Both matter, and they do different jobs.
Do not rely on a decorative fixture for task lighting. A pendant in the centre of a walk-in has exactly the shadow problem described above. It needs strips doing the actual work underneath it.
Colour temperature: the setting that decides whether you can match anything
This is the technical detail that most affects whether a closet works, and it is almost never discussed.
Colour temperature is measured in kelvin. Lower numbers are warmer and more yellow. Higher numbers are cooler and more blue.
Temperature | Appearance | Suitable for a closet |
2200K to 2700K | Very warm, candle to soft white | Too yellow, distorts colour |
3000K | Warm white | Good for a dressing room feel |
3500K to 4000K | Neutral white | Best for judging colour accurately |
5000K+ | Cool white to daylight | Clinical, but truest colour rendering |
For most closets, something in the 3000K to 4000K range is the practical answer. Warm enough to feel like part of the house rather than a retail stockroom, neutral enough that navy and black look different from each other.
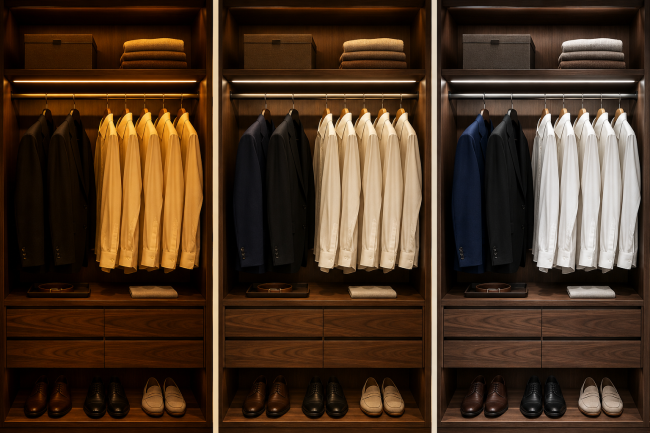
The Department of Energy’s guidance on colour-tunable lighting products is worth reading if you want to go further, since tunable systems let you shift the temperature depending on what you are doing.
The other number that matters: CRI
Colour rendering index measures how accurately a light source shows colour compared with natural daylight, on a scale to 100.
Cheap LED strips frequently sit around 70 to 80 CRI, which is where colours start looking flat and slightly wrong. Anything above 90 renders colour well enough that what you see in the closet is what you get outside.
For a closet specifically, CRI matters more than in most rooms, because the entire purpose is judging colour and texture. It is worth asking about, and it is not usually expensive to specify well.
How much light you actually need
Brightness is measured in lumens, not watts. Watts tell you power draw, which on LEDs bears almost no relation to output.
The useful figure for strip lighting is lumens per foot, because you are lighting a run rather than a room.
Application | Output per foot | Notes |
Accent or toe-kick glow | 100 to 200 lumens | Atmosphere, not task |
Under-shelf task lighting | 250 to 450 lumens | The working range for most closets |
Rod lighting | 300 to 450 lumens | Lighting garments at depth |
Mirror or dressing area | 400 to 600 lumens | Judging colour against skin |
Deep pantry or garage shelving | 400 to 500 lumens | More depth to cover |
Two practical points.
More sources beat brighter sources. Four modest strips under four shelves light a run far better than one very bright strip at the top, because each one covers the zone directly beneath it.
Overlighting a closet is possible. A run at 800 lumens per foot in a small reach-in is uncomfortable, and it makes the closet feel like a display case rather than part of the house. The aim is even coverage, not maximum output.
LED strip specification, briefly
Three numbers on a spec sheet actually matter.
LED density, given as diodes per metre. Higher density means the individual points of light blend into a continuous line rather than reading as dots. In a closet where the strip is often visible from below, density matters more than in a concealed cove.
Voltage. Most closet installations run 12V or 24V through a driver rather than mains voltage. 24V holds output more consistently over a long run, so it suits a full walk-in better.
IP rating, which describes resistance to dust and moisture. A bedroom closet does not need a rated strip. A garage, a basement or anywhere with humidity does.
Where light belongs, by zone
The reach zone principle applies here as much as it does to storage.
The US Access Board’s guidance on reach ranges puts the unobstructed reach range between 15 and 48 inches above the floor. That is an accessibility standard for public buildings rather than a rule for a private closet, but it identifies the band you interact with daily.
Zone | Height | Lighting needed |
Floor to 15 in | Shoes, bulk storage | Toe-kick strip, or strip under the lowest shelf |
15 to 48 in | Drawers, folded stacks, hanging | Strip under every shelf, rod lighting |
48 to 72 in | Hanging, accessible shelving | Strip under shelves, rod lighting |
Above 72 in | Seasonal, luggage | Strip under the top shelf if it overhangs |
The room itself | Aisle, dressing area | Ambient fixture, mirror lighting |
The pattern: everything in the daily-use band needs its own light source. Above and below that, one strip covers the zone.
Lighting for specific storage
Different contents want different treatment.
Hanging garments. The problem is depth. A rod 24 inches deep lit from a shelf above throws light onto the shoulders and leaves the lower two thirds in shade. A strip immediately above the rod, angled outward, lights the length of the garment rather than the top of it.
Folded stacks. A strip under the shelf above them, which is the default. Where shelves are close together, one strip can serve two levels.
Shoes. The darkest zone in most closets, because it is at the bottom and everything above shades it. Angled shoe shelves benefit particularly, since the light catches the whole shoe rather than the toe. A toe-kick strip handles the lowest row.
Drawers. Lighting inside a drawer sounds excessive and is genuinely useful for jewelry, watches and accessories, where the items are small and dark. A small strip or puck triggered by the drawer opening costs very little at build stage.
Glass-fronted cabinetry. Interior lighting turns a cabinet into a display. Worth doing wherever the contents are worth showing, and worth skipping wherever they are not.
Handbags and structured items. Shelf-mounted strips work, but avoid lighting that puts heat or strong direct light onto leather over long periods.
Wiring and power: what sits behind the strips
The part nobody sees and everybody eventually has to deal with.
Every LED run needs a driver, which converts mains voltage down to the 12V or 24V the strip uses. It is a small box, roughly the size of a paperback, and it has to live somewhere.
Three rules for where it goes. Somewhere ventilated, because it generates a little heat. Somewhere accessible, because it has a finite life and will need replacing before the cabinetry does. And somewhere the noise does not matter, since some drivers hum faintly.
The usual answer is inside the top of a tall cabinet or behind a removable panel in the toe kick.
Sizing the driver to the run matters. A driver run at its maximum capacity gets hot and fails early. Specifying one with headroom is cheap insurance.
Long runs and voltage drop. Over a long continuous strip, the far end draws less power than the near end and reads slightly dimmer. Feeding the run from both ends, or splitting it into two shorter runs, solves it. This is a design decision rather than an installation fix.
Plugged in or hardwired. A plug-in system is simpler and needs an outlet inside or near the closet. Hardwiring is neater and needs an electrician. In a closet with no existing power, hardwiring is usually the moment to also add an outlet, which is useful for a steamer or a vacuum.
Mirrors, and the lighting mistake people repeat
A full-length mirror in a closet or dressing area lit only from above produces the same shadow problem, on your face this time. It is the reason people get dressed in the closet and then check themselves in the bathroom.
The fix is the same as in a bathroom. Light either side of the mirror at roughly face height, rather than above it. Where wall lights are not possible, a backlit or edge-lit mirror achieves something similar.

Colour temperature matters even more here, because you are judging how a colour looks against your skin.
Switching and controls
Worth deciding at design stage, because it affects the wiring.
Motion sensors are the most useful control in a walk-in. The light comes on as you enter and goes off behind you, which matters more than it sounds in a room you frequently enter with your hands full. They also stop the light being left on.
Door-activated switches do the same job in a reach-in, coming on when the door opens. Simple and effective, though they only work with a door that closes fully.
Dimming lets one installation serve both jobs: bright for finding things, low for a dressing room feel. Worth specifying the driver for it from the start, since not all LED strips dim well.
Separate circuits for task and ambient lighting. A pendant and the strip lighting should not be on the same switch, because you want them at different times.
Smart control is available and genuinely useful in a large dressing room, though for most closets a motion sensor does the job at a fraction of the complexity.
What has to be planned during the build
This is the practical divide, and it is why lighting belongs in the design conversation rather than after it.
Must be planned during construction:
- Recessed channels routed into shelving for a flush strip installation
- Wiring routed behind panels rather than surface-run
- Power supply and driver location, which needs to be accessible but hidden
- Any hardwired fixture, including pendants and wall lights
- Switch and sensor positions
- Additional circuits where the closet is being rewired anyway
Can be added afterwards:
- Surface-mounted LED strips in an adhesive or clip-on channel
- Battery or rechargeable puck lights, useful in a rental or as a test
- Plug-in strip systems where an outlet is already present
- Motion-sensor battery units
The honest summary: a retrofit gets you most of the function and none of the neatness. Visible wiring, a plug trailing to an outlet, and channels that read as added rather than built in.
If you are already remodeling the closet, adding the lighting costs a fraction of what it costs later, because the panels are open and the run is short. It is among the cheapest upgrades available at that moment and one of the more expensive ones afterwards.
Lighting by closet type
Reach-in closets
Frequently have no light at all, or a single bulb in the ceiling of the closet itself which the door blocks.
The effective arrangement: a strip under the shelf above the hanging rod, and a second strip under the top shelf if there is one. A door-activated switch removes the need for a separate control.
Where the door has been removed and the opening treated as an alcove, the lighting becomes visible from the bedroom, so it is worth choosing a warmer temperature and a concealed channel.
Walk-in closets
The most to gain and the most to plan.
Strips under every shelf on both runs, rod lighting in the single-hang section, toe-kick lighting for the shoe storage, and one ambient fixture for the room. Motion sensor at the entrance.
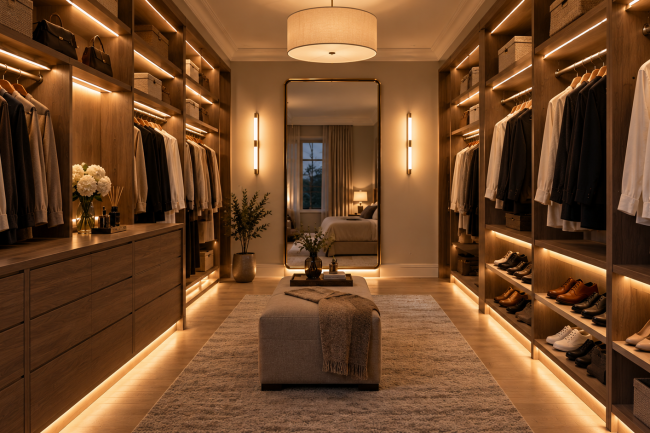
If there is an island, lighting inside the drawers is a genuine luxury that costs very little at build stage.
Dressing rooms
Everything above, plus mirror lighting at face height and dimming so the room can be bright for finding and soft for dressing.
Pantries
The same principle for a different problem. A pantry with deep shelves and one overhead light has an unreadable back row. Strips under each shelf make the whole depth usable, which is the practical fix for a pantry that is full but never seems to have anything.
Garages, mudrooms and laundry
Garage storage benefits from strips under wall cabinets for exactly the same reason a kitchen does: the counter or bench below is otherwise in shadow.
A mudroom benefits from a low-level or motion-activated light, since it is often used in the dark at both ends of the day.
A laundry room needs light on the folding counter rather than only on the floor.
Heat, safety and the practical details
LEDs run cool, which is why they suit closets. Older incandescent fixtures were a genuine hazard in an enclosed space full of fabric, and building codes have long restricted bare bulbs in closets for that reason. LED strips and enclosed LED fixtures remove that concern.
Keep some clearance anyway. Storage pressed directly against any fixture is a bad habit regardless of the technology.
Drivers need ventilation and access. The power supply for an LED run generates a small amount of heat and will eventually need replacing. Building it into a sealed void is a decision you regret in year eight.
Dimmable means driver-dependent. An LED strip that dims well and one that flickers at low output can look identical on a spec sheet. This is worth asking about rather than assuming.
What it costs and where it sits in a project
Lighting is a small proportion of a closet project and a disproportionate share of how the finished room feels.
Three things drive the number: the length of run being lit, whether channels are recessed into the shelving or surface-mounted, and whether anything is hardwired rather than plugged in.
The cost sits mostly in labour and in the electrical work where a fixture is hardwired. The strips themselves are not the expensive part.
The comparison worth making: adding lighting during a closet build is a modest line on the quote. Adding it two years later means an electrician, opened panels and visible channels, for considerably more.
Closet & Beyond provide a personalised design, 3D renderings and a cost estimate on the same day as your consultation, so you can see the lighting priced as part of the whole rather than as an afterthought. If you want a range first, the instant quote tool gives you one online.
A worked example
A 7 by 10 foot double-sided walk-in with 8 foot ceilings, one door, no window.
Both runs, 10 feet each, carry three shelves plus hanging. That is six strip runs at roughly 300 lumens per foot, fed at 24V, with two drivers rather than one to avoid voltage drop over a long run.
Single-hang section on the end wall gets a rod-mounted strip at 350 lumens per foot.
Toe kick along both runs at 150 lumens per foot, on the same circuit as the shelf strips.
Ambient: one flush ceiling fixture at 3500K, on its own switch.
Mirror on the end wall, with wall lights either side at face height, on a third switch.
Control: motion sensor at the entrance triggering the shelf and toe-kick strips. Ambient and mirror on manual switches, both dimmable.
Drivers in the top of the tall cabinet on the left run, behind a removable panel.
That is roughly 70 feet of strip, three circuits and two sensors. It is a considerable improvement over one bulb, and the cost sits mostly in the electrical work rather than the strips.
Common mistakes
- Relying on the room’s ceiling fixture. It is behind you. That is the entire problem.
- One pendant and nothing else in a walk-in. It looks good and it does not light the shelves.
- Choosing a very warm temperature for the whole closet. Below 3000K, colours distort and matching becomes guesswork.
- Ignoring CRI. A cheap strip at 70 CRI makes everything look slightly wrong.
- Lighting the mirror from above. It shadows your face, which is why you end up checking in the bathroom.
- Putting task and ambient on one switch. You want them at different times.
- Sealing the driver into an inaccessible void. It will need replacing eventually.
- Leaving lighting until after the build. It is cheap during and expensive after.
Frequently asked questions
Why is my closet so dark even with a light in it?
Almost always because the light is behind you. A ceiling fixture positioned behind where you stand puts your own shadow onto the storage you are looking at. The fix is more sources positioned closer to what they light, usually LED strips under each shelf, rather than a brighter overhead bulb.
What is the best colour temperature for closet lighting?
Between 3000K and 4000K for most closets. Warm enough to feel like part of the house, neutral enough that you can tell navy from black. Below 3000K colours distort toward yellow, and above 5000K the light reads as clinical.
What is CRI and why does it matter in a closet?
Colour rendering index measures how accurately a light shows colour, on a scale to 100. Cheap LED strips often sit at 70 to 80, which makes colours look flat. Above 90 is worth specifying in a closet specifically, because judging colour is the whole point of the room.
Can closet lighting be added to an existing closet?
Yes, with limitations. Surface-mounted LED strips in an adhesive channel, plug-in systems and battery puck lights all retrofit. What you cannot easily add afterwards is recessed channels, concealed wiring and hardwired fixtures, so a retrofit gets you the function without the neatness.
Do LED closet lights get hot?
LEDs run cool compared with older incandescent fixtures, which is why they suit enclosed spaces full of fabric. The driver generates a small amount of heat and should be installed somewhere ventilated and accessible, since it will eventually need replacing.
Should closet lights come on automatically?
A motion sensor is the most useful control in a walk-in, since you frequently enter with your hands full. A door-activated switch does the same job in a reach-in. Both also stop the light being left on.
Where should lights go in a walk-in closet?
Strips under every shelf on both runs, rod lighting in the single-hang section, a toe-kick strip for the shoe storage, and one ambient fixture for the room. If there is a mirror, light either side of it at face height rather than above.
Is closet lighting worth the cost?
It is among the cheapest upgrades at build stage and one of the more expensive ones afterwards, which makes the timing the real question rather than the value. Most clients who skip it during the build ask about it within two years.
Getting the light right
The order that works: decide the layout and the storage first, then plan the lighting to serve it, then choose the finish. Lighting planned last becomes lighting omitted.
The test is simple. Stand where you will stand when you use the closet, and ask what is casting a shadow on what. If the answer is you, the lighting needs rethinking rather than the shelving.
Closet & Beyond designs, builds and installs custom storage across Virginia, Maryland, Washington DC and West Virginia. You can see completed work across every room type on our custom closets page, browse the full range of solutions, or read more on the blog, including our guides to closet remodeling ideas and small space organization.
Book a free design consultation in your home, virtually or at the showroom, and we will look at the lighting alongside the layout rather than after it. You can also get in touch with a specific room in mind.